Nezhdanov Posted August 5, 2021 Posted August 5, 2021 Wow that’s a lot! Glad to help [emoji1303]Sent from my iPhone using Tapatalk Quote
bishopdonmiguel Posted August 6, 2021 Author Posted August 6, 2021 Couple of quick updates. Constructed a Sash. Wanted it to have a bit of bulk and shape support so used 3 layers of material with some interface on the inside bottom layer. Also tapered the ends and left some extra material on the top layer to provide some folds to give it a more wrapped look vs. flat fabric. Decided on the boots. I didn’t like the fit of the cheapest $20 Walmart “duck” boots so I upgraded to some $30 ones that had a wide fit in my size. With the use of some $10 adjustable foot supports, they are quite comfortable but still concerned with moisture. Will see how that goes. Currently undergoing an E6000 adhesion test. Quote
bishopdonmiguel Posted August 6, 2021 Author Posted August 6, 2021 Another small update. Got a collar added to the inner tunic. I don’t expect this will be seen as it will hopefully be covered by the mask material and/or scarfing. But wanted to protect the neck area and also have an insurance policy for hiding skin. A bit of elastic inside allows for some stretch to get over my noggin’ while bunching the fabric somewhat around the neck. Quote
fleasome Posted August 7, 2021 Posted August 7, 2021 I use a tan turtleneck and tan balaclava off of Amazon. Balaclava also kept my hair out of the fans when it was long like yours. 1 Quote
Nezhdanov Posted August 7, 2021 Posted August 7, 2021 Balaclavas are often used and can solve the problem. Some members wrap material round their necks to manage the problem also. An alternative is a tk neck seal style of wrap that has material over your shoulders as well. The robes go over the neck seal and you tuck the neck seal into your helmet. This covers the neck area, chin and base of skull.My wife put these together using thin left over material from the costumeSo it’s what works best for you really!Just remember the crl states “The neck seal can be a thin "scarf" of fabric, but is not thick and bulky as is seen on prequel Tuskens”. [emoji1303]Sent from my iPhone using Tapatalk 1 Quote
bishopdonmiguel Posted August 15, 2021 Author Posted August 15, 2021 Outer robe update. Due to fabric shrinkage and the reach of my arms, I had to double the robe cost and join two pieces together. As my table space is limited, I resorted to working on the floor. Once I got the seam done, cut fold, model, rinse and repeat until I got the fit and the fabric hang that I was looking for. The edges will get a simple hem while the bottom gets some serging to allow for fraying but prevent unravelling. Quote
Nezhdanov Posted August 15, 2021 Posted August 15, 2021 Looks like it’s coming along, be good to see how it fits! I think most have to use two panels sewn together up the back as it’s rare to find material large enough to do it in one piece and it looks like that was the case in the film too. 1 Quote
bishopdonmiguel Posted August 15, 2021 Author Posted August 15, 2021 Time to dye the robes. For the inner robe, I used the tea dye method. I boiled two batches of 36 Lipton (black) teabags for 15 minutes and let cool enough to hand squeeze the bags. I poured these batches into a large storage container and added enough hot water to cover the fabric. I let this soak for about 30 minutes, stirring every few minutes and removed. I let this sun dry. The material took the tea well, below you’ll see the difference versus the original color. Candidly, I didn’t like the “peach” tones created by the tea. Fortunately, after setting out in the sun for a few days and then washing, the color is much more pleasing to my eye. For the outer robe, I used Rit. I had planned to use Taupe but the stores in my area didn’t have that color so I opted to follow the Rit formula for “sand.” Used tan and a yellow which were both in stock. I used HOT water from the tap (125 F) and filled the storage container with 12 gallons of water and dye using 4 pounds of fabric as my measurement guide. After soaking the fabric in hot water, I submerged it into the dye bath and stirred continuously for about 15 minutes. The monk’s cloth took the dye well but in retrospect I probably should have added a touch of Pearl Grey. I am generally pleased with the results but some grey might have produced a better color. I then added the cotton duck to the dye bath and was surprised that it didn’t take the color well, mostly yellow no tan. I assumed the dye bath wouldn’t dilute but the fabric must have pulled out all the tan from the water. I prepped another smaller batch using a 5-gallon bucket, this time using some Pearl Grey, and the duck took the color well. I set all the fabrics in the sun for a few days, washed and hang dried. Quote
Nezhdanov Posted August 16, 2021 Posted August 16, 2021 The dye process can be a bit hit and miss but you seem to have had a productive session and the colour looks like it’s come out well! Quote
bishopdonmiguel Posted August 16, 2021 Author Posted August 16, 2021 The Gloves and arm wraps. Thanks to @fleasome for suggestion to use these beekeeper gloves. Instead of separate gloves and arm wraps, using these provides an all-in-one solution and eliminates any risk of showing skin. Plus they are very reasonably priced, $16 as I recall. While the order instructions recommended Medium, I selected size Large and the fit is good if a bit loose. Perhaps Medium would have been better but I’d rather have a glove that fits loosely versus one I can’t use. The gloves are white and need to be colored and weathered. I wiped the gloves with some alcohol and applied a diluted Fiebing’s Saddle Tan dye solution, 1 part dye to 20 parts rubbing alcohol. Even diluted, the color was much too rich but I knew I’d need to weather these regardless of the outcome. Also, I thought “tan” would be more of a brown vs. yellowish. Perhaps I should have used diluted “brown” instead, although I do kinda like having different tones in the costume as it looks more like a scavenged outfit vs. something bought from the local Tatooine Outfitters store. I roughed up the gloves using 150 grit sandpaper and a metal rasp file. After I got the texture I was looking for, I faded the color using a rag soaked in rubbing alcohol and squeezed the excess dye out. After drying, looked nice and sun bleached. Will add some dirty when I get around to weathering the entire costume. To add the wraps, I sewed directly to the glove fabric using a zig-zag stitch on the sleeve arm of my sewing machine. Ensure the first wrap overlaps the end of the glove then spiral the wrap back towards the elbow end taking care that the wrap covers your stitch work. You can always add another layer of wraps under the folds if any stitches happen to show. If you use these, I’d recommend you also dye the white fabric using Rit. I neglected to do this and had to deal with ensuring it didn’t peek out under the wraps. Quote
bishopdonmiguel Posted August 17, 2021 Author Posted August 17, 2021 Bandoliers arrived. After estimating the price of constructing a set for myself, I ordered these from Trooperbay as they were offered at a price point that seemed very reasonable for the effort I would save. I did note that eBay has much cheaper options from international sources but I’d rather not deal with all that. At ordering, I was concerned with what the quality might be like but having now received and inspected… I will say they are very impressive for the price. Now I just need time to weather these up. As there doesn’t appear to be ready made options for the waist belt, seems I will need to make that myself. Quote
thebrighton Posted August 17, 2021 Posted August 17, 2021 Cosmic Workshop in the UK make the waist belt but as you have already mentioned it is price over building it yourself: https://cosmicworkshop.co.uk/product/tusken-raider-belt-pouches/ https://www.facebook.com/cosmicworkshop1/?ref=page_internal Quote
Kayelbe Posted August 17, 2021 Posted August 17, 2021 1 hour ago, bishopdonmiguel said: I did note that eBay has much cheaper options from international sources but I’d rather not deal with all that. It was several years ago now, and I know you've already got them covered, but FWIW I ordered a couple bandoliers from an Indian seller on Ebay--they arrived on my doorstep in Arizona (USA) like 4 days later. No hassle there. Quote
bishopdonmiguel Posted August 17, 2021 Author Posted August 17, 2021 3 hours ago, thebrighton said: Cosmic Workshop in the UK make the waist belt but as you have already mentioned it is price over building it yourself: https://cosmicworkshop.co.uk/product/tusken-raider-belt-pouches/ https://www.facebook.com/cosmicworkshop1/?ref=page_internal These look very nice. Tempting for sure. Thanks for pointing these out as I wouldn’t have known they were available otherwise. Quote
bishopdonmiguel Posted August 17, 2021 Author Posted August 17, 2021 2 hours ago, Kayelbe said: It was several years ago now, and I know you've already got them covered, but FWIW I ordered a couple bandoliers from an Indian seller on Ebay--they arrived on my doorstep in Arizona (USA) like 4 days later. No hassle there. I think the ones I was looking at were from India. Quality looked quite good but estimated transit time was 3-4 weeks as I recall which is what turned me off. Now 4 days, even a week, that would have been a different decision altogether. Thank you for the info. Quote
fleasome Posted August 18, 2021 Posted August 18, 2021 Tie them behind your car and drive around the closest dirty asphalt abandoned shopping mall for about 3 minutes. 1 Quote
bishopdonmiguel Posted August 19, 2021 Author Posted August 19, 2021 I think I’m ready to apply wraps to the mask but need to address the fit first. I decided to cut strips from EVA foam floor mats and use as padding. The process was straightforward but tedious. Taped in temporary strips until I could determine proper location and thickness. Once I was satisfied, was just a matter of applying contact cement. The nice thing about the EVA pads is they can be drilled through after placement to help with venting. They can also be sanded down to further refine the fit. Quote
bishopdonmiguel Posted August 19, 2021 Author Posted August 19, 2021 (edited) Like others have noted, the helmet is a bit forward heavy. Instead of simply counterweighting the back, figured I could solve two problems at once by adding a neck extension using some Kydex sheet I had on-hand. After I got the padding installed, I cut a rectangular piece of Kydex and shaped it roughly using a heat gun. Did some shaping, riveting and edge finishing and now have an extended neck to apply wraps to instead of then hanging loose. The balance is now much more comfortable as well. The last thing I did was drill some holes near where my ears sit. Unsure if this will help with the ability to hear but figure it’s worth a shot and not something that could be easily done later. Edited August 20, 2021 by bishopdonmiguel 1 Quote
bishopdonmiguel Posted August 20, 2021 Author Posted August 20, 2021 With the mask padding all done, I had an opportunity for a quick test fit today. I need to work on adding something to help keep the neck closed after my big noggin' gets through. Didn't add enough elastic to do the job. Quote
Nezhdanov Posted August 21, 2021 Posted August 21, 2021 Interesting approach with the head padding, glad you were able to get it secure, last thing you want is a bobble head! I like that you’ve managed to make the outer robe loose and it looks like it will have some volume and folds along the lines of the film, which is not always easy to achieve! You’ve managed a good length to the wrists and arms with the outer robe and looks like it won’t get under your feet. Good base colours on the robes too. Taking shape now and I look forward to seeing more! Are you planning to weather the robes and other elements when completed or sticking to the dyed colours? 1 Quote
bishopdonmiguel Posted August 21, 2021 Author Posted August 21, 2021 1 hour ago, Nezhdanov said: Good base colours on the robes too. Taking shape now and I look forward to seeing more! Are you planning to weather the robes and other elements when completed or sticking to the dyed colours? Thank you for the encouragement. Not always easy to know if things are going the right direction or not without feedback, good or bad. So I appreciate the time you have taken to comment on the work. DEFINITELY planning to weather the robes and wraps. I need to do that with permanent options (acrylic paint I think) because I do plan on washing the garments occasionally to remove the “troop funk” and my test of coffee/tea as weathering choices did not hold up well against a cold water cycle. Quote
Nezhdanov Posted August 21, 2021 Posted August 21, 2021 No problem, glad to help in some small way! It can be tricky doing a project over many weeks, months or years sometimes, to keep on track and not miss things. When dressing up we would try to mimic the poses in the film and see if our costumes looked similar in look or the robes hang etc. It’s not the same pose but some of how the robe hangs and fits to the wrists etc. Is similar to yours. With acrylic, if your used to using them then it can be a good way of getting a worn effect but can be hard work. If you wash the acrylic weathered robes you will likely need to re-apply some of the paint as some may be removed. I made a big mistake weathering with acrylic and we washed it while still wet and it removed most of the paint so can be a forgiving medium too. I’ve used this picture before but this is my costume with mostly acrylic weathering across most of the costume. I added the ridge on the end of the splitters and used better metal effect paint on the face greeblies after this photo was taken. 1 Quote
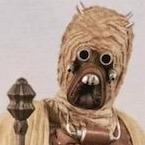
bishopdonmiguel Posted August 25, 2021 Author Posted August 25, 2021 Finally get to add wraps to the mask! I applied a base layer using E6000 to ensure the dark brown plastic would not show. I also figured this would provide an easier medium to glue the wraps to, which it did nicely. After the adhesive for the base layer cured, I cut out the material around the vent holes with the hopes it will help with ventilation. Quote
bishopdonmiguel Posted August 25, 2021 Author Posted August 25, 2021 With the base layer ready for adhesive, I applied the wraps using E6000. The process was straightforward. I’m not trying to replicate any screen used mask, just trying to embody the style. I tried to avoid placing too many wraps in the same direction and after I had the head covered I pieced in wraps to create a more complicated look. Any comments on suggested changes are welcome. Quote
Nezhdanov Posted August 25, 2021 Posted August 25, 2021 You’ve managed some good random wraps which can be tricky to achieve. I think it adds to the look of the costume and adds character. Not a big deal but just thought I’d mention there is part of the crl that states ‘head wraps are not unkempt and do not hang loosely over the neck or shoulders’. You’ve completed the head well and i feel it captures the essence of those seen in the film! It will be good to see the last few bits come together! 1 Quote
Recommended Posts
Join the conversation
You can post now and register later. If you have an account, sign in now to post with your account.