thebrighton Posted November 28, 2020 Posted November 28, 2020 So that didn't work, hopefully this will: https://www.kraytclan.net/forum/topic/4390-id-that-tusken/ 1 Quote
bishopdonmiguel Posted November 28, 2020 Author Posted November 28, 2020 25 minutes ago, thebrighton said: So that didn't work, hopefully this will: https://www.kraytclan.net/forum/topic/4390-id-that-tusken/ Oh yes, that is very interesting. B is a good example of the one I've been seeing in my head. Having said that, there is definitely a range of positions between the different masks. GREAT info. Quote
bishopdonmiguel Posted November 30, 2020 Author Posted November 30, 2020 I adjusted the Blood Spitters model again and reprinted, shortened a bit and reduced the oblique angle by half. I think this is the design I will proceed with. 1 Quote
bishopdonmiguel Posted December 6, 2020 Author Posted December 6, 2020 (edited) Added some pleather to the face using contact cement. Was unsure how much I needed so there is definitely excess. I can trim as necessary when I get ready to add the fabric strips. Three is a seam at the bottom of the eye area as it blends into the nose. I also cut a pie hole for the fabric. Wasn't sure how large a hole is needed but this is a start. Edited December 6, 2020 by bishopdonmiguel additional info Quote
bishopdonmiguel Posted December 6, 2020 Author Posted December 6, 2020 For the Snout, looks like there are 2 main layers with a brow piece and a thin wrap. Before dyeing the leather, I need to dry fit so I started with a wide piece long enough to wrap around the Snout. Because I lack a third arm & hand, I decided to temporarily mount the piece to the jaw using Chicago Screws after the initial cuts as I was unable to make accurate markings for further cuts. I may use this piece for a template and remount later using another method, unsure. Once mounted, I could make pencil marks for additional cuts as this piece is oversized to allow for trimming and getting a good shape with angles that match the mask base... at least that's the plan. I marked the inside and out where necessary to ensure I wasn't over trimming. I then joined the marks and cut with a pair of heavy duty scissors. Quote
bishopdonmiguel Posted December 6, 2020 Author Posted December 6, 2020 After trimming, this first piece of leather fits nicely around the Snout area. Any concerns with the fit? Quote
bishopdonmiguel Posted December 6, 2020 Author Posted December 6, 2020 For the second leather wrap, I followed the same basic method using another oversized strip. The first piece is at the bottom of the picture and the second at the top. There is a small notch for the area around the bridge of the nose. These are spare pieces of leather I had laying around from another project and they seemed a bit thick for this use. I reduced the thickness using a belt sander. Fortunately, leather sands quite easily and the edges can be shaped with sandpaper or a Dremel. This is a bit of a rough fit but seeking any feedback or suggestions before I dye the leather and permanently attach. I will be working on the last 2 pieces after these are finalized. Quote
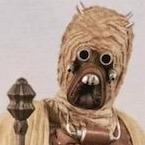
fleasome Posted December 6, 2020 Posted December 6, 2020 All 3 of the helmets in ANH shown in that one picture earlier are slightly different on snout wraps and placement. Quote
bishopdonmiguel Posted December 6, 2020 Author Posted December 6, 2020 I suppose what I’m asking is “does this look sufficiently Tusken?” Quote
Michael Hawkins Posted December 7, 2020 Posted December 7, 2020 I like how you chose to wrap the majority of the face in leatherette - not just the bloodspitters and eye stalks. It's definetly looking good! 1 Quote
fleasome Posted December 7, 2020 Posted December 7, 2020 Yes. Helps if I answer when not looking on my tiny phone. Quote
RMDphoto Posted December 7, 2020 Posted December 7, 2020 So with this mask base how do you do the inner mouth tucked part? Quote
bishopdonmiguel Posted December 7, 2020 Author Posted December 7, 2020 7 hours ago, RMDphoto said: So with this mask base how do you do the inner mouth tucked part? No idea whatsoever. There are no instructions or detailed builds that I found so I’m problem solving as I go. If I’m successful, hopefully this thread will help others with this mask base. Quote
bishopdonmiguel Posted December 8, 2020 Author Posted December 8, 2020 Getting ready to work on the mouth tucking but need that Nose/Teeth part finished first. Now, I know we all hate sanding PLA. Total drag. But I'll share my technique that makes the process easier and saves you from carpel tunnel syndrome. This technique will NOT work on parts that have a lot of intricate detail but flat surfaces it work great. First, sand the part using 150 grit paper. Try to sand in circles to minimize any grooving. All you need to do it knock down the layer lines. Took me about 5 minutes to do this. Next, apply a thin layer of well mixed 2-part epoxy all over the part. I use a toothpick. Don't worry about it not being perfectly smooth because you're going to sand most of this off later. You can use the 5-minute stuff or the longer cure 15-minute if you need more time. This is similar to using a product like XTC-3D to fill in the depressions but it's much cheaper and I always have 2-part epoxy on hand. LET IT CURE 24 HOURS. If you try to sand before it's hard, you will regret doing so. Quote
bishopdonmiguel Posted December 8, 2020 Author Posted December 8, 2020 After the epoxy has hardened (not sticky to the touch), sand with 320 grit paper. Remove most of the epoxy, just leaving the depressions filled. You'll notice the uneven areas of the epoxy as you sand. Just keep sanding until everything looks smooth. Took me about 5 minutes for the outside, then another 5 to sand between the Teeth. Once you're happy with the finish, apply 2-coats of acrylic clear gloss. Sand between coats with 400 grit paper. Let dry per instructions on can. Once dry, apply the paint of your choice. This is "Aluminum," nice and bright but I'll probably weather this up later. Needs to dry for a day before I mount to do the fabric tucking. 2 Quote
thebrighton Posted December 8, 2020 Posted December 8, 2020 Great to see someone putting in the work to smooth that print out. Unfortunately I see too many people give it a quick sanding and decide that will do. About the best printed example I've seen. You could be forgiven for thinking it's aluminium , brilliant 1 Quote
B-Man Posted December 9, 2020 Posted December 9, 2020 Wow... that nose piece is amazing. I might have to re-do mine. Definitely the best 3d printed one I've seen. Great job. Glen. 1 Quote
bishopdonmiguel Posted December 10, 2020 Author Posted December 10, 2020 (edited) Thank you for the kind comments. I hope this thread helps others with this mask base. Today's updates. Dyed the two main leather wraps. Because the leather is from different hides, the color isn't the same but I like that. It's a feature. Also modeled and printed a reinforcing mount for the Nose/Teeth. This will sit on the inside of the mask and prevent the screws from ripping through the ABS, although that's very unlikely but I tend to over engineer things. Edited December 10, 2020 by bishopdonmiguel add photo Quote
bishopdonmiguel Posted December 10, 2020 Author Posted December 10, 2020 Time for tucking the pie hole fabric. I was concerned that the material would tend to "deflate" over time so I applied some foam around the area using hot glue. Without a solid frame around the entire mouth, wasn't sure where I'd apply adhesive to attach the fabric. To provide a mounting point, I hot glued some nylon strapping around the Snout area. This provides a guide as well as a material that hot glue sticks to very well. Quote
bishopdonmiguel Posted December 10, 2020 Author Posted December 10, 2020 Wow, getting the fabric to look naturally folded is a challenge. My effort is certainly not the same as the screen masks but this fabric is obviously different. Overall I'm pleased with the look. For now, the fabric is just bunched up on the inside. After I attach the Snout leather, I will invest more effort on the folds and open up a small breathing hole. Quote
bishopdonmiguel Posted December 10, 2020 Author Posted December 10, 2020 For the Snout leather, I decided to attach the first piece using rivets and then hide those with the second piece. Two large rivets at the bottom (because I had previously used Chicago Screws for a temporary mount) and a small one on the bridge of the nose to keep everything together. Quote
bishopdonmiguel Posted December 10, 2020 Author Posted December 10, 2020 Second leather piece is attached to the first using contact cement. The rubber bands will help keep the pieces together until the glue dries. Later, I'll probably add a small leather strip over the Nose/Teeth to help fill that space. \ Quote
thebrighton Posted December 10, 2020 Posted December 10, 2020 Creating the pleats around the mouth is certainly a challenge but it looks like you're getting there, great work. Quote
Recommended Posts
Join the conversation
You can post now and register later. If you have an account, sign in now to post with your account.