bishopdonmiguel Posted November 21, 2020 Posted November 21, 2020 Build thread! I'm a 501st member with an ANH Stormtrooper Stunt (OTTK). Also working on a FOTK but keep running into creative walls with that... it's a difficult assembly. I needed a break with something less "armor" centric. My good friend and fellow member Fleasome has a Tusken and thought it looked like a fun build. Hoping to get help and feedback from the good people here. My mask kit is from Studio Creations. Quick shipping and what seems to be a good quality pull. I have modeled a set of greeblies and plan to 3D print. I will have some questions about these as the sizes I found here on the forums seem "off," at least for this mask. Since I modeled them from scratch, I can make any necessary changes specific to this mask base. Okay, so let's dive right in. First thing I did was to create a quick template using paper to determine the ideal hole spacing. Holding this an inch or so from my face I could see things clearly. I will use this more to understand possible sight issues versus a definitive placement for the Eye Stalks. I then drew a centerline across the mask and marked the ideal hole placement... Quote
bishopdonmiguel Posted November 21, 2020 Author Posted November 21, 2020 Using the "version 1" of my Eye Stalks (base is 1.84in and top is 1.48in per some blueprints on this forum), I marked the location on the mask. Note the "ideal" eye holes are not centered within these markings. So the first set of questions... is this going to be a problem? I'm sure I will be able to see out of these holes but what is the consensus on best positioning? Before I cut, I want to weigh the pros/cons if there are any... Quote
bishopdonmiguel Posted November 21, 2020 Author Posted November 21, 2020 Regarding the Eye Stalks, the base seems to be an appropriate size but I have a few questions. Should there be a bigger border around the base? Or should the Eye Stalks be flush with the edges? Quote
bishopdonmiguel Posted November 21, 2020 Author Posted November 21, 2020 Now regarding the tips of the Eye Stalks, the is a taper (1.84in to 1.48in) but it just doesn't seem enough. They look too "straight" for lack of a better description. Believe I've seen another set of dimensions here that indicate 1.65in base and 1.25in tip. That seems like it would be more accurate but before spending another 2 hours printing a new Eye Stalk, wanted to get some feedback. Furthermore, the angle of the eye mount on the mask worries me a bit. Seems the Eye Stalks will point more skyward than I see in photos, although until I mount a test set and try the mask on, I won't know for sure. I can model in an angle on the Eye Stalks if necessary. I welcome any feedback for this. Quote
thebrighton Posted November 21, 2020 Posted November 21, 2020 Visibility is the most important thing so first off make sure you can see. Sizes will differ as people have different size heads and distance between their eyes whilst there are a number of mask suppliers which will all be a little differently proportioned, some are good others not so! When building your lid and adding the greeblies just make sure they are proportioned well and match screen shots. With regard to whether the eyes should be flush with the edges etc it doesn't really matter as the wraps will hide the edges. Quote
bishopdonmiguel Posted November 22, 2020 Author Posted November 22, 2020 Thanks for the feedback. Redesigned the Eye Stalks to increase the taper. Much happier with this shape. While I was at it, I created a mount ring that will attach to the back of the mask base and allow the Eye Stalk a connection point for gluing. I left a 0.05 gap to account for the thickness of the mask. Any concerns with the shape of my Eye Stalk? I can adjust after the next fitting but want to make any suggested changes if there are obvious issues. Quote
thebrighton Posted November 22, 2020 Posted November 22, 2020 Shape looks fine, just stacks of sanding to look forward too Also remember for extra accuracy the slots are angled at 30-45 degrees rather than horizontal. Quote
fleasome Posted November 22, 2020 Posted November 22, 2020 IF you make the mount ring adjustable you could be ANH 45 or Mandalorian 90 on the fly. Quote
bishopdonmiguel Posted November 23, 2020 Author Posted November 23, 2020 My vinyl cutter provided some helpful cutting guides. I drilled the center holes to check the spacing for my eyes. I could see fine so I opened the holes with a step bit and finished off with a Dremel sanding wheel... Quote
bishopdonmiguel Posted November 23, 2020 Author Posted November 23, 2020 The 3D printed retention collar mounts to the inside of the mask, and the external stub will provide the glue point for the Eye Stalk. The blue tape is temporary to hold the Eye Stalk in place. You will also note I have added the "Teeth" part. Need to put a test wrap around the Snout to determine if it is long enough to protrude from the leather appropriately... 1 Quote
bishopdonmiguel Posted November 24, 2020 Author Posted November 24, 2020 I don’t know about you, but I can’t find the center of a circle to save my life. So I again call upon my vinyl cutter to assist. A couple of basic circles and I can get those Blood Spitters just where I want them without having to attempt a “drill in place” procedure. I quite like the little bit of tip detail as seen on the Diamond closeup so I modeled that in. I don’t see it often so is that allowed? Any feedback on the overall look here? Next step will be to add the “leather” to the face so I’d like to ensure these pieces, at least the base sizes, are satisfactory. 1 Quote
RMDphoto Posted November 25, 2020 Posted November 25, 2020 Looking good so far, only suggestion I can think of is make sure you sand and paint your silver parts now before you do the leather wraps and lock that nose in place. I would suggest a couple good coats of filler primer to hide the print lines and sand down smooth as you can get. Then either a silver spray paint or my personal favorite is satin black and then rub with either a silver rub-n-buff or I really like the look of graphite powder. You may need to even put a skim coat of bondo or spot putty on the nose to get rid of the faceted look and smooth it out. 1 Quote
bishopdonmiguel Posted November 25, 2020 Author Posted November 25, 2020 Looking good so far, only suggestion I can think of is make sure you sand and paint your silver parts now before you do the leather wraps and lock that nose in place. I would suggest a couple good coats of filler primer to hide the print lines and sand down smooth as you can get. Then either a silver spray paint or my personal favorite is satin black and then rub with either a silver rub-n-buff or I really like the look of graphite powder. You may need to even put a skim coat of bondo or spot putty on the nose to get rid of the faceted look and smooth it out.All great suggestions! If I didn’t note it clearly, these are temporary mounted. I didn’t want to invest any effort in smoothing things out if I needed to adjust the models and reprint parts. Once they are “final,” they’ll be getting the “sand and fill for eternity” treatment. Quote
thebrighton Posted November 25, 2020 Posted November 25, 2020 Nice touch with the end of the spitters, no reason why that would be an issue with clearance as the screen evidence is there for all to see 1 Quote
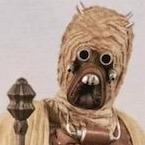
bishopdonmiguel Posted November 28, 2020 Author Posted November 28, 2020 There is something "off" about this mask vs. screencaps and I spent some time analyzing the issue. At first, I thought the angle of the Eye Stalks were the problem but after more consideration, I think the problem is Blood Spitters. In the reference photos that I have looked over, the centerline of the Eye Stalks and the Blood Spitters are similar and the Spitters point "over" the Nose. With this mask, the Stalks and Spitters point in very different directions and the Spitters are lower than the Nose. To Illustrate... Now look at mine (posted previously)... I also think the Blood Spitters and Eye Stalks are TOO LONG. So I go back to the 3D design lab to address these issues. Quote
bishopdonmiguel Posted November 28, 2020 Author Posted November 28, 2020 To address the angle of the Blood Spitters, I add an oblique angle to the base. To allow a long screw to be used for additional support, I also designed an oblique mounting block for the back of the mask. While I was in the lab, I reduced the height by a half inch or so. In the second photo, the mounts are seen inside the mask... Quote
bishopdonmiguel Posted November 28, 2020 Author Posted November 28, 2020 Here are my redesigned Blood Spitters and shortened Eye Stalks. Notice how the centerlines of the Spitters are similar to those of the Stalks. Also note the Spitter ends are above the Nose, not below. Interesting that this mask seems to have contemplated this type of mount as the cheek bulge is now in alignment with the Spitter. So perhaps not a perfect fix but I think much better than the original design. I also think the original Eye Stalks may have even been a bit smaller diameter than these but I've already cut the mounting holes and at this point, I'd rather have more vision than less. Any and all feedback is welcome. Quote
thebrighton Posted November 28, 2020 Posted November 28, 2020 I'm not convinced and your photo looking down on the lid with eyes and spitters being parallel just looks wrong to my eyes. In the photo below of Peter Diamond you can see the spitters aren't parallel and point down and outwards: Are the reference photos you've posted further up all of ANH Tuskens and I wonder if the weight of the aluminium fittings have pulled down on the shell of the lid over the years distorting it a bit. Of course it could look completely different again once the wraps are on. Quote
bishopdonmiguel Posted November 28, 2020 Author Posted November 28, 2020 I’m not yet educated enough to say if the reference photos I posted are confirmed as ANH, just the best ones I found online in an effort to understand what are described as screen used mask from various angles.I do agree that Diamond screencap and BTS photo look less aligned than what I have illustrated, but also definitely not as out of alignment as my original test fit.The good news with the oblique end I can rotate to change the alignment somewhat as I go forward.Thanks for the feedback. Good stuff. Quote
thebrighton Posted November 28, 2020 Posted November 28, 2020 The thing to remember with photos off the web is that there were only ever 4 lids made for ANH and I think only a couple still survive. There a lot of photos out there claiming to be screen used but they're not. Quote
fleasome Posted November 28, 2020 Posted November 28, 2020 Here are the pics I put into a drive when doing my research. I found that a lot of people making their costumes were off on this and that detail and numerous posts referenced non movie pics. I have found in various cosplay research over the last 15 or so years that even places like Disney theme parks will post or put something in an exhibit that is neither screen used nor accurate. At any rate, hope these help. https://www.dropbox.com/sh/qnvy0jjvhqui95p/AACAAjugAv4oamuSnlTzOKOBa?dl=0 2 Quote
bishopdonmiguel Posted November 28, 2020 Author Posted November 28, 2020 Very helpful indeed. This is what I'm seeing on the Diamond BTS pic. Spitters line up just above the Nose while pointing slightly downwards vs. Eye Stalks, perhaps a bit to the sides too. Quote
thebrighton Posted November 28, 2020 Posted November 28, 2020 This thread should also help as it identifies the 4 lids and how they differed: Quote
Recommended Posts
Join the conversation
You can post now and register later. If you have an account, sign in now to post with your account.