fleasome Posted December 11, 2020 Posted December 11, 2020 My snout pieces were extremely thin leather scrap pieces, about 12 or so that was in the kit. In hind sight it wasn't that difficult to layer then a little at a time but was the scariest part of the build as I was afraid as I glued each piece that I would mess up and not be able to remove them. Quote
Michael Hawkins Posted December 14, 2020 Posted December 14, 2020 Fleasome, can I please ask you how on earth have you been taking screenshots of the tuskens on disney plus? Disney plus has somehow disabled it on every player I can think of. Quote
fleasome Posted December 14, 2020 Posted December 14, 2020 9 hours ago, Michael Hawkins said: Fleasome, can I please ask you how on earth have you been taking screenshots of the tuskens on disney plus? Disney plus has somehow disabled it on every player I can think of. Print Screen button on PC. Then paste into any graphic program.. If you get a black screen it is not Disney, it is a video acceleration setting on your system. Quote
B-Man Posted December 14, 2020 Posted December 14, 2020 18 hours ago, Michael Hawkins said: Fleasome, can I please ask you how on earth have you been taking screenshots of the tuskens on disney plus? Disney plus has somehow disabled it on every player I can think of. Fleasome answered for PC, but on a mac, after you have paused on the frame you want to capture, open ‘Preview’ and simply go File > Take Screenshot, then choose either ‘From Selection…’, ‘From Window…’ or ‘From Entire Screen’. Glen. Quote
Chewbiker Posted March 2, 2021 Posted March 2, 2021 (edited) Nice Edited March 2, 2021 by Chewbiker Quote
Chewbiker Posted March 2, 2021 Posted March 2, 2021 bishopdonmiguel! Thank You! Looking awesome! I'm certainly going to re-do my 3d printed parts! 1 Quote
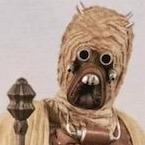
bishopdonmiguel Posted July 21, 2021 Author Posted July 21, 2021 Long time no post! The lack of trooping opportunities has really dampened my motivation but I'm slowly getting back into this build. Got the Eye Stalks and the Blood Spitters sanded and painted. I ran out of my go-to 2-part epoxy for filling the print lines so I substituted Humbrol gloss. Turns out it is much easier to apply evenly so I will definitely use this product for future work. A coat of clear gloss then aluminum and these are ready to go. 2 Quote
thebrighton Posted July 21, 2021 Posted July 21, 2021 They're probably the best looking printed greeblies I've seen, you could easily mistake them for aluminium, great work. 1 Quote
bishopdonmiguel Posted July 23, 2021 Author Posted July 23, 2021 Time to assemble the halves. I'm detailing how I dealt with this for the benefit of anyone else with a Studio Creations mask. YMMV. Obviously make sure the assembled helmet will fit your noggin'. I have a large head and this barely fits. Unlikely there will be any room for cooling fans installed for venting. Perhaps around the mouth area. We will see how that goes but right now not planning for any. E6000 and some tape to hold the halves together while curing would probably be sufficient but opted for using rivets. Be sure the smooth part of the rivet in on the inside of the helmet and you use a washer on the outside to prevent the rivet from pulling through the ABS. Helps if you have an adjustable rivet tool to get the angle just right inside the helmet when pulling. Harbor Freight has a nice one for about $10. Start with a central rivet. Put a bead of E6000 around one half and place a rivet at the bottom edge while ensuring the halves fit together nicely. Do the same for the opposite side. Add additional rivets to close any gaps. I used 9. Run a bead of E6000 on the seam, inside and out, and let cure. Quote
bishopdonmiguel Posted July 25, 2021 Author Posted July 25, 2021 Another small update. I cut and dyed the leather accessories for the snout. I'm using my 1st set of Eye Stalks to prevent damaging the aluminum paint on the hero pieces. I glued the "tongue" piece with E6000 and secured with rubber bands and tape. I'll let that set before wrapping the strap around the snout tomorrow. Quote
bishopdonmiguel Posted July 27, 2021 Author Posted July 27, 2021 Glued the strap on the snout. Not a great photo but you get the idea. The Eye Stalks here are still a rejected set so they look a bit odd. Quote
bishopdonmiguel Posted July 27, 2021 Author Posted July 27, 2021 Designed a printed a set of Warrior Spikes. The reinforcing mount will hopefully prevent the screw from pulling through the helmet should the Spike suffer any external force. As to placement, looks to me like these go on in a “square” pattern. If there is a specific recommendation for positioning, please shout. Putting these on tomorrow and will fill/paint after that. Quote
Nezhdanov Posted July 27, 2021 Posted July 27, 2021 We glued and screwed our greeblies so only a larger knock should move them. As for the placement of the spikes, the old photos can be a bit fuzzy but the Peter Diamond front right spike, as you look at it, seems to be at a different angle. The middle one of the group back left, as you look at it, seems a bit off too so it might be best to roughly measure a square or slight rectangle and then place what looks best by eye based on your other greeblie position and head shape etc.Sent from my iPhone using Tapatalk 1 Quote
Nezhdanov Posted July 27, 2021 Posted July 27, 2021 If the middle image is an issue could admin please remove as I can’t edit my posts thanks Quote
bishopdonmiguel Posted July 27, 2021 Author Posted July 27, 2021 @Nezhdanov Thanks for the advice. I appreciate it. Using the screen caps, I placed the Spikes where I thought they looked best while avoiding the seam. I tried not to make these too symmetrical and picked nearby spots that allowed the spikes to sit as flat as possible. If anyone thinks I should move a particular Spike, speak up. I plan to put vent holes in the helmet anyway so repositioning isn't a problem. Quote
Nezhdanov Posted July 28, 2021 Posted July 28, 2021 For me (as you look at it) on at the face, right spike distance from top of right eye stalk is less than the left. The other views seem to look ok. I think (as you look at it) the left front spike could come forward a bit?The pain will be adjusting one spike and trying to keep a relatively square arrangement.We had the same issue, as the two halves are not a uniform shape the curves are different for each of the hemispheres so the spikes sit a little differently.This one, for example, has the front two spikes slightly different distances from the eye stalksBut does blend in more with the wraps and at different anglesSent from my iPhone using Tapatalk 1 Quote
bishopdonmiguel Posted July 28, 2021 Author Posted July 28, 2021 @Nezhdanov Good eye! That right Spike misalignment was intentional based on this photo. I do enjoy asymmetry and that funky angle looks cool to my eye. Granted this mask base doesn’t replicate the original in quite the same way. Quote
fleasome Posted July 28, 2021 Posted July 28, 2021 I am going to get my protector and tape measure out at the first troop. I actually want to do a more battle worn Tusken helm at some point with a broken spike and a missing eye. 1 Quote
bishopdonmiguel Posted August 1, 2021 Author Posted August 1, 2021 (edited) Warrior Spikes sanded and painted. Moisture venting holes added. Time to mount the hero greeblies. I think I will design and print an internal mount for the fabric to block the eyes. Will be removable in case the fabric needs changing. Also need to figure out some padding so the helmet sits properly on my head. I should Probably insert a bit of leather on the Nose/Teeth thingy because there is a small gap that is bothering me. But for now, this is done until I get the fabric ready for application. Edited August 1, 2021 by bishopdonmiguel Change image links. Quote
bishopdonmiguel Posted August 4, 2021 Author Posted August 4, 2021 I acquired some fabric… osnaburg for the inner robe and monk’s cloth for the outer. For size reference, I’m 5’10”, 190 pounds. I will be utilizing the general construction method illustrated by Studio Creations with a few adjustments as I go because I have no idea how their measurements will fit my frame. I will be starting with the inner robe. According to the document, 4 yards of 48” wide material should be sufficient. I laid out the fabric, folded along the width edge and cut this into 2 equal pieces. One for the upper torso/arms, the other for the skirt/legs. The skirt piece gets refolded into 3 layers along the length so you’re left with a piece 48” high and 24” wide. After serging the raw edges and folding the edge for durability, I stitched 24” from each edge on the bottom arms leaving a hole in the middle. I straight cut in the top middle just big enough for my noggin’ that allowed me to test the size. Arms will definitely need some adjusting in length and perhaps volume. For the skirt, I created a reinforcing fold along the upper edge where it will connect with the hole in the upper torso piece. Remember, 2 of the 3 layers will face front with the 3rd layer covering your posterior. I found turning the garment inside out helped while connecting the 2 pieces together. If you do this, just make sure you keep the front/back properly oriented if you have already decided which side of the torso piece will face front. Once I had the garment assembled, I can see that the length will need to be shortened a few inches but I need to decide on the boots I’m using before I do that. I think I might also try to construct a straight collar of sorts to help hide the neck using the extra material from the skirt. Also will need some of that for the stash. Quote
Nezhdanov Posted August 4, 2021 Posted August 4, 2021 Hi, nothing wrong with the inner robe construction or material, you may need some off the length but you could hold off trimming until you’ve got your waist sash and used that to adjust the length a bit. The reason I say that is you can make some creases at the front and also increase the material seen at the front by adjusting with the sash as the film robes are voluminous!Here the inner robe has got some good volume and creases[emoji1303]As for monks cloth, if you haven’t washed it already, it will shrink quite a bit when being washed so measure after washing and also take care removing from the machine.Also, if you haven’t already, sew about an inch in round the edges to prevent too much material fraying. We didn’t use monks cloth for our Tuskens but my wife made a Jawa using it some years back and it frays quite easily.As for boots, many use wellington boots or ‘wellies’, I’m not sure how universal those terms are? You can drill holes for ventilation in like the helmet before covering. There have been a few who have adapted old trainers into boots, this might be a bit more of a challenge but there are a few options.We used something a bit different as we wanted some comfort (and I never liked wearing wellies) as you can be on your feet a long time when trooping.They came out ok.Good to see more progress [emoji4]Sent from my iPhone using Tapatalk 1 Quote
bishopdonmiguel Posted August 4, 2021 Author Posted August 4, 2021 @NezhdanovAgain, thank you for taking the time to post the helpful tips. Appreciated. You are correct about the sash and I hadn't thought about that. I will grab another yard of material before cutting. It's between $3 and $4 a yard at Walmart so not worth putting that off. I really like the idea of those cloth boots. Unfortunately, not finding any for a reasonable price... everything well into the $100+ range. While I don't like the idea of all rubber boots, I might start with some $20 "dairy boots" (probably the same as wellies) and see how that goes. Quote
fleasome Posted August 4, 2021 Posted August 4, 2021 Boots: Just think about when and where you are going to wear them. As we get some hot troops in your region we went with the rubber boots and I added custom orthotics, Barbara added store bought insoles. 100+ degree troops with 100% humidity might get super hot in a furry boot. The wraps and glue are cheap if you wanna make 2 pairs for our Winter troops. I just adjust with thick thermal socks in the winter. Outer Robe: When you get there I suggest having boot height figured out. I truly like a little ground drag on my outter robe. I like the look and fraying that comes with it. Makes it look more weathered. I just raise my arms to get it off the ground when walking in groups. 1 Quote
bishopdonmiguel Posted August 4, 2021 Author Posted August 4, 2021 @fleasome Mostly worried about sweaty feet and no place for the moisture to escape. My only experience with “rubber” shoes are Crocs and when my feet get wet they become very unstable as my feet slide around. Heading to Walmart today to check out the “dairy” boots and get more material to make the sash. Quote
bishopdonmiguel Posted August 5, 2021 Author Posted August 5, 2021 On 8/4/2021 at 6:06 AM, Nezhdanov said: As for monks cloth, if you haven’t washed it already, it will shrink quite a bit when being washed so measure after washing Thank you ! You totally saved my a** with this advice. I estimate the darn thing shrunk by nearly a foot on width after washing. WOW! Quote
Recommended Posts
Join the conversation
You can post now and register later. If you have an account, sign in now to post with your account.