Nezhdanov Posted April 14, 2025 Posted April 14, 2025 Great progress! I’ll ask other staff about the neck as I can’t recall off hand without checking properly (and I am at work).As this project is ongoing, it may not be very fair to mention a few things regarding the head so far. However I will mention a few things just in case they have been overlooked! So apologies if I mention something you are planing to do but haven’t got that far yet.This is not meant to be a criticism but just to highlight some observations. I don’t think these things will prevent clearance or stop the head looking like the one seen in the series [emoji4]This is not very scientific, the image below, but the eyes might be a little large in circumference so there is not as much gap in between the eyes compared to the screen references? I only mention this as greeblie positioning for Tuskens, especially specific characters can really help with the look of the costume.I will mention that it has been pointed out before in other threads that the splitters also seem asymmetrical in the references with one pointing a slightly higher angle than the other. It is difficult to know if this was by design, did it take a knock during ‘combat’ or is it just the way the photos have been taken. It’s difficult to know for certain but is a fun little detail that could be added to a warrior build.The nose piece could afford to be more asymmetrical with quite differing sized cutouts?It may be one of the few examples where the splitters can be positioned pointing more straight than usually seen on Tuskens. However, the splitters splay in the right of the below image may be camera distortion making the splay appear greater than the references?There seems to be more mouth fold material in the mouth area that only leaves quite a small mouth opening in the references. The right hand mouth is quite wide with a larger gap. Mouth wraps are difficult so that is just an observation not a criticism!The bottom corners of the mouth area also seem a little more rounder in the references?The leather top front wrap material is curved towards the bottom of the mouth area revealing an overlap from a top wrap to an underside of the mouth area wrap. There seems to also be mouth fold material visible but this could simply be because of the angle the photo had been taken at.I’m sure you would be addressing this along with the finer stud and weathering details anyway!The ‘nose’ metal greeblie seems to be more rounded on the reference. I’m using the display reference here simply as it is clearer than the screenshots but it is difficult to be certain.I’m sure you were aware of / getting round to what I’ve mentioned [emoji4]Sent from my iPhone using Tapatalk 1 Quote
Nezhdanov Posted April 17, 2025 Posted April 17, 2025 Hi,I asked the other staff your neck wrap question and also they gave a little more clarity on the waist belt pouch fastening.So, pouch first.In episode one the pouch looks like this sans stud push through as also seen on the display version.In episode two is the previously observed and mentioned stud push through. So we would alter the crl to allow for either as both are seen.For the neck wrap, here it looks like two pieces and that the head wraps are longer more to the bottom of the neck with another layer of fabric around the neck. The crl image is similar but we could look at clarifying some of the wording around this.Hope this helps [emoji4]Sent from my iPod touch using Tapatalk 2 Quote
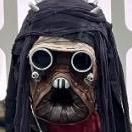
Kagamaru Posted April 20, 2025 Author Posted April 20, 2025 It ain’t 501st work if ya don’t do it twice. Took off the other eye tubes and replaced with a slightly smaller diameter tube spaced farther apart. Rounded the snout and filed it more. The slot differential is super obvious to me anyway. I can put my finger all the way on the left side. Not at all on the right. Pushed the splitters around to make them asymmetrical. They are as straight as I can make them without starting completely over I think. I added more mouth wrap, making the hole much much smaller and rounding out the corners. Added the studs on the snout. Layered on black head wrapping and dreads. Added the studded strip in the back. Need some advice on making it twist and stay twisted. Right now I have it twisted and clamped with clothespins overnight hoping it will stay like that. Maybe heat? I tried to match the head wrap as closely as I could. I’m pleased with how it looks. I will be adding weathering tomorrow and hunting around for some jewelry/earrings to add on. I'm still a bit unclear on the gaiter. I wonder how long it is. Does it just hot glue on the inside rim of the mask? Leave a split in the back? What do Tusken Raider costumes do? Can I just copy that exactly? I feel this is turning out really nice. I’m excited to get it finished! It looks so awesome live. Intimidating. 1 Quote
Nezhdanov Posted April 20, 2025 Posted April 20, 2025 Great work!It can seem picky with some of the alterations but the head does benefit from it and is looking really good so great work adapting [emoji4]Sent from my iPhone using Tapatalk 1 Quote
Kagamaru Posted April 21, 2025 Author Posted April 21, 2025 Weathering, jewelry, moth screen, lenses. I bought a cheap pair of plastic lenses aviators and cut them down to obscure my eyes. Found a black plastic basket to deconstruct for the mouth. It’s fairly invisible but if it is seen it looks very Star Wars. I couldn’t find the exact long earring so I bought a cheap long earring and some small pearl plastic studs that came in a pack with barriers sizes. A little hot glue and I got a decent replica of the screen used dangly. The weathering is a mix of spray paint, hand painted application, and abrasion. I installed the gaiter. It’s attached all the way around with a split in the back that overlaps. Worked out pretty well, although I will need a handler to get me sorted out and tucked. Someone to make sure the dreads are emerging correctly, etc. I had to give the full suit a try with the helmet. It’s just so cool. Quote
Nezhdanov Posted April 21, 2025 Posted April 21, 2025 Looking good! It’s coming together well and I’m looking forward to seeing the final bits being added!I was going to suggest a TK style neck wrap that tucks into the helmet. We did that for our ANH Tusken heads and it’s a good solution but does require help from others to put on. This image is a mid build progress shot of the neck wrap going into the head with stud fastening at the back. It goes over the shoulders also and the outer robe and breather covers most of it.The only thing with the lenses is if it reflects flash photography. People do sometimes set cameras to have flash enabled at events but it is something you can test out.We used a fairly fine gauze on our ANH Tusken heads and it doesn’t show anything beyond it even when using a flash. It doesn’t obscure your vision (any more than the costume does anyway).In progress example.These are just examples of one way to approach this though [emoji4]I haven’t seen any examples in builds mentioning how to twist the stud strip at the back. I wonder if this would benefit from water to alter the material? It could be that as you pack it away to go to events it will naturally start to crease and fold? It shouldn’t stop you clearing though [emoji4]Sent from my iPhone using Tapatalk 1 Quote
Kagamaru Posted April 22, 2025 Author Posted April 22, 2025 (edited) I have the leather, tubing, and pvc pipe for the main body of the breather. What are people using to get the domed look on the ends. And is there a specific product (US based) that I can get for the flared nuts. Is it actual flared nuts? https://a.co/d/g1vC2R9 ? https://a.co/d/hrLlj70 ? https://a.co/d/3uCgmGl ? Edited April 22, 2025 by Kagamaru Quote
Nezhdanov Posted April 22, 2025 Posted April 22, 2025 Hi,This is off the display model but the flare nuts examples you had links to does not seem to match the shape.This is off the screen shotsThe crl builder thought outside the box for this and went for something that would have a similar silhouette.Maybe something along these lines would work?Sent from my iPhone using Tapatalk Quote
Kagamaru Posted April 22, 2025 Author Posted April 22, 2025 (edited) Okay, I just made my own. I used the screen capture and made it to scale with a 2" diameter cylinder then copied exactly. Printing now. There is a 1/4" hole to fit the aluminum tubing. I'm linking the file here for anyone coming after me: https://drive.google.com/drive/folders/11hTsJ-85H3WNNd0FZqwHxR2vuccVQJMu?usp=sharing I'll post photos of the finished print when done. 7.5 hour print at .06 detail. Okay so the first one didn't print so great, so I made another. Same link. Edited April 23, 2025 by Kagamaru 1 Quote
Kagamaru Posted April 24, 2025 Author Posted April 24, 2025 Gotta go out of town this weekend but did get these printed. My tubing will be here today. I’ll test the fit when I get back and report. I think these will work. Link to this new file is in the previous post here. 1 Quote
Kagamaru Posted April 30, 2025 Author Posted April 30, 2025 Ok while I’m finishing the costume I’m also looking ahead to the gaffi. I’ve modeled this bit in Shapr3D. If you think it looks pretty close I’ll upload here for whomever wants a 3D print. I’m actually looking for someone that can take the 3D file and mill it out of aluminum. Quote
Nezhdanov Posted April 30, 2025 Posted April 30, 2025 Looking good! I think the connecting metal to the wooden part of the weapon looks like it would need to be a bit wider. There is a good overhang of the metal compared to where it joins the wooden part and grip area. In the image below the ‘blades’ may not be flat on in the angle but the width of the metal area that joins the wooden part seems a similar width to the blades in this particular image.To get a good idea of the proportions you would also need to relate to the size of the wood part you plan to use to the width of the metal part. If you plan to use a broom handle for example, you would need to proportion accordingly.The image is fuzzy but the metal step part does not seem as wide as the wooden part.In this display image, there is the metal versus wooden part proportions are hinted at. The width of the metal steps and start of the blades are at a skewed angle but gives an idea.The width of the metal step part in the image below seems not as wide as in the image above so both may be a bit misleading.I would suggest getting a good clear screen grab, if possible, and also proportion to what wood you plan to use.Hope that makes sense and I’m looking forward to seeing how this turns out [emoji4]Sent from my iPhone using Tapatalk 1 Quote
Kagamaru Posted May 3, 2025 Author Posted May 3, 2025 More progress tonight. Finished the breather. Pretty pleased with it. The printed end caps work really well. I might hit them with a little more paint. I got impatient and made some fingerprints. Sanded them with 800 grit sandpaper so it looks weathered. But ¯\_(ツ)_/¯ It hangs well and is in a good location below my neckline. The gaffi part was reworked. I made the base end a little shorter and tried to match up the spacing of the ridges as close as I could tell. The flair at the end is 2 in. I plan for the staff to be 1.75 in. in diameter. This print is full sized. My printer wasn’t tall enough to accommodate the height so I used the 3D software to cut it in half and made a cylindrical void in the middle to be able to inset a dowel rod. I’m making this file available as well to whomever wants to use it. I’ll link both the single piece and two-piece files here. I found a place that can 3D print in stainless steel! It’s a little pricey but I’m in it now all the way. I want the gaffi to be the crowning jewel on this costume. Quote
Kagamaru Posted May 3, 2025 Author Posted May 3, 2025 Gaffi tip in two pieces: https://drive.google.com/file/d/1AUMJHlZ4slEzGFVmz9XAloOGKuU7JrKe/view?usp=drivesdk Gaffi tip in one piece: https://drive.google.com/file/d/18Y1q62Cb3ogUFEzqLZ1Avxznply7frX3/view?usp=drivesdk Quote
Nezhdanov Posted May 3, 2025 Posted May 3, 2025 Looking good! I’m glad you are paying attention to the accessory, sometimes they are not given the attention they deserve but are an important tie in to the look of the costume [emoji4]Sent from my iPhone using Tapatalk 1 Quote
Kagamaru Posted May 4, 2025 Author Posted May 4, 2025 It has begun. Takes about an hour per strand. I didn’t time the copper bead attachments. That was fairly tedious, opening each chain link, placing the chain, then closing it up. I bought wooden beads and stained them to varying values of brown/black. I just put the stain in a paint bucket and dumped the beads in and swished them around. The longer you leave it the darker they get to a point. For the darkest ones I hit it with a light mist of black spray paint. The Bauxite beads at the bottom we both difficult to find and very expensive for the ones I did locate. I couldn’t justify the cost for a part that could be easily faked. So I used terracotta colored Sculpey, rolled into a ball, ran a toothpick through the middle and rolled out a cylinder. Trimmed to size. Then widened the hole a little by grabbing the ends of the toothpick and rolling it like a rolling pin. Going to take a week I’m afraid. A couple strands per night. I can already tell it’s going to be heavy as a cinder block. No wonder the Obi looks like it’s struggling to stay up. Staining the saucer beads. Quote
Kagamaru Posted May 10, 2025 Author Posted May 10, 2025 Soooo close to being finished. Last wooden beads threaded last night. Two copper strands to go then it Obi time. Quote
Nezhdanov Posted May 10, 2025 Posted May 10, 2025 Looking good! Everything is looking correct but I’m not going to count the beads [emoji16]The only thing I noticed which I don’t think is a big deal, is the two criss cross gold rectangular pieces towards the very bottom of the bead work appear a little larger on your bead work than the display version. I couldn’t get a good view from the references. As I say not a big deal!The other query I have is there appears to be a random medallion piece as part of the reference bead work that is not in all scenes? I’ll check with the other staff in case this pops up in one episode and not others but can be something we add to the crl updates as an option to include.Well done for getting that part of the costume complete though!Sent from my iPhone using Tapatalk Quote
Kagamaru Posted May 10, 2025 Author Posted May 10, 2025 Here it is complete. The squares are larger. I couldn’t find a resource for smaller. They are at the end and very easy to replace if I ever run across them in the future. As for the medallion. It looks easy to attach like the other bits. Any clue as to what would be close? Or a source? I could put a challenge coin there! Got a Krayt Clan Coin to trade to me? https://i.imgur.com/ddBPrFD.gifv Quote
Kagamaru Posted May 10, 2025 Author Posted May 10, 2025 I might be able to take my Dremel and just cut one of those square ornaments in half height-wise. Quote
Kagamaru Posted May 10, 2025 Author Posted May 10, 2025 Also just noticed this from your screenshot. I have an extra hoop from the mask I can use here. Might also need to be added to the crl. Quote
Nezhdanov Posted May 10, 2025 Posted May 10, 2025 I’ll have a look at other shots to see if that loop pops up often. It can be something to add if so.I wouldn’t worry too much about the pieces at the bottom of the bead work, if it pops up during clearance then maybe alter it but I think all the appearance of the references is there in your work [emoji4]Sent from my iPhone using Tapatalk 1 Quote
Recommended Posts