Kagamaru Posted September 27, 2024 Posted September 27, 2024 Starting my build thread here and dropping a few links for reference to get going. https://ladycampbellsstitchery.wordpress.com/2022/03/15/book-of-boba-fett-tusken-warrior/ I will be searching for the helmet/mask first. Quote
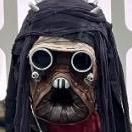
Kagamaru Posted February 12, 2025 Author Posted February 12, 2025 Printing this mask. https://www.thingiverse.com/thing:4888297 Are the greeblies the same as a normal tusken raider? thanks Quote
Nezhdanov Posted February 12, 2025 Posted February 12, 2025 Hi!No they are quite a different style. Just about everything is different from the length, style, lack of cutouts in the eye stalks and even the ‘nose’ metal greeblie has a different curve and look.ANH Tusken ‘face’ greeblies are very different.Also different from AotC, PM and Mandalorian Tusken greeblies. Sent from my iPhone using Tapatalk Quote
Kagamaru Posted February 12, 2025 Author Posted February 12, 2025 Is there a 3d print source available? Thanks! Quote
Nezhdanov Posted February 13, 2025 Posted February 13, 2025 There is bound to be but as I don’t 3d print I can’t point to one . Hopefully one of our members that 3d print can suggest something!Sent from my iPhone using Tapatalk 1 Quote
Kagamaru Posted February 15, 2025 Author Posted February 15, 2025 (edited) I’m starting on the tunic, skirt, and pants for the Tusken Warrior while my mask parts finish printing and have a couple questions: 1. Can I use black heavyweight cotton joggers for the pants? As a base of course. I know they will need to be enhanced with black cheesecloth strips. 2. Is there a specific pattern for the tunic and skirt. I’m fairly novice at sewing but I did manage to make a decent set of Jawa robes. If it’s not much difficult than that I think I can swing it. What was helpful with that was a few how to videos out there. What are people using for the warrior tunic? Is there an appropriate yardage it would take? Edited February 15, 2025 by Kagamaru Quote
Kagamaru Posted February 16, 2025 Author Posted February 16, 2025 Also, do I see some sort of cloth panel backing behind the beads? Quote
Nezhdanov Posted February 17, 2025 Posted February 17, 2025 Hi,I don’t remember seeing a particular pattern shared? The person who made the costume for the crl may have shared this but sadly that thread was lost in a matrix glitch. All we have is the crl discussion herehttps://www.kraytclan.com/forum/topic/8441-501st-bobf-warrior-crl/Maybe a member who has made this costume can share a pattern?You should be ok wearing those bottoms as they would be covered up with other material.As you are doing the beads, this build had some in depth bead links and thoughts on what the beads are.https://www.kraytclan.com/forum/topic/8621-tusken-warrior-spadille’s-wip/Not sure about a backing for the beads, could just be the material behind them giving that effect? It seems to me the beads are hanging without anything particular behind them.All the best [emoji4]Sent from my iPhone using Tapatalk 1 Quote
Kagamaru Posted February 19, 2025 Author Posted February 19, 2025 Got the base together. Beads and leather and cloth are slowly rolling in. Should have most supplies by next week. Planning to finish the helmet first. Quote
Kagamaru Posted February 20, 2025 Author Posted February 20, 2025 More process. Attached the seams with zip ties (be sure to put the knobby bits on the outside). Put a bit of E6000 to make it solid and keep it from shifting. Quote
Kagamaru Posted February 21, 2025 Author Posted February 21, 2025 https://a.co/d/7Upm8WL Wondering if this would work for the studded ribbon on the back of the mask. If I attached it in 4 rows to another strip of cloth to bind it. Quote
Nezhdanov Posted February 21, 2025 Posted February 21, 2025 Yes I think that will look the part! Looks very similar to the what’s used in the crl [emoji4]Sent from my iPhone using Tapatalk Quote
Kagamaru Posted February 23, 2025 Author Posted February 23, 2025 (edited) Robe all sewn up! I’m going to angle the split up the left side a little to expose the leg a bit more. Then weathering of course. For a pattern I just used a deconstructed long sleeve tshirt. Then the skirt was kind of from the hip. Just kind of a trapezoid with the bottom about 2 feet wider than the top. The sleeves were a challenge to attach. I’ve never done that before. But it worked and fit! It’s actually comfortable and I can move around/bend just fine. 3 Questions: Can I attach the wraps directly to the sleeves or does it have to be an extra overlay. For weathering, would you suggest a highly diluted bleach/water solution and a spray bottle. Kind of spritz it down and let it sit a minute then wash. Repeat until the desired weathering? Can I use red corduroy for the panel in the front of the shawl? Edited February 24, 2025 by Kagamaru Quote
Kagamaru Posted February 24, 2025 Author Posted February 24, 2025 Recut the slit to be a bit longer. I think this is gonna work! Can’t wait to see it weathered. Quote
Nezhdanov Posted February 24, 2025 Posted February 24, 2025 Hi!3 Questions:Q, Can I attach the wraps directly to the sleeves or does it have to be an extra overlay.A, I’m not sure they have to be either way particularly. As long as the finished effect looks like the warrior in the series.However there may be some benefit to having sleeves you can take off. If you use something like hot glue to affix your wraps, for a while they might be quite ridged and stiff. Over time and use though, they can become spongy and may need some slight repairs as the glue softens and the material comes away. A sleeve you can take off can make repairs easier, you could make a backup pair to swap out and you could also take the sleeves off on a hot troop while on a break.Just some thoughts [emoji4]Q, For weathering, would you suggest a highly diluted bleach/water solution and a spray bottle. Kind of spritz it down and let it sit a minute then wash. Repeat until the desired weathering?A, I am not going to say no but I think bleach could be problematic. By all means test it out on a spare piece of material to see what you think. I’ve done quite a bit of watered down acrylic spray painting for weathering ANH Tuskens, sometimes you get accidental splotches which are not necessarily a problem but I’m not sure how that would look if that happened with bleach? Definitely test out your idea on an off cut as it may prove to be a good approach!I would suggest trying to add sandy / dusty looking weathering via paint or other means as in the world the character lives, that’s more what would gather on the clothes. The weathering to me looks more like a build up of dust and sand on top of the materials and there is a variety of colours to this.Q, Can I use red corduroy for the panel in the front of the shawl?A, I would say that depends on what the material looks like. If it’s fairly subtle like the zoomed images below then I don’t see why not.This is a display imageDisplay image zoomed, it looks like a criss cross weave but is hard to see.Crl image zoomed, there is a ridge but could also look a bit like a criss cross weave.I take the approach that any way of creating a costume like this is valid if it looks like the source material. So I’ve not said no to your questions but I would test your ideas out and get material samples / photos close up to see how they match. Hope you have some success [emoji4]Sent from my iPhone using Tapatalk 1 Quote
Kagamaru Posted March 3, 2025 Author Posted March 3, 2025 Shawl day! It’s a little snug as per the crl but I’m currently slimming down so it will loosen up the smaller I get. It has the look but there will be no battles where I lift my gaffi stick above my head. The bits that are sticking up in the photo have since been glued down. Nice and trim. I love the weathering. Spray paint: Light gray, Sand, and a reddish brown. I weathered it before attaching the panel. Panel is attached with hot glue. https://i.imgur.com/9wSwQpb.gifv https://i.imgur.com/NlbtttD.gifv The yoke around the top looks like this had to have a few goes at it before I got to right. It was hard to get my brain around it so hope this helps someone else. Use lots of pins to hold the curve. I put a small slit in two places on the top of the strip layer to help it curve around without bunching. Quote
Nezhdanov Posted March 3, 2025 Posted March 3, 2025 Looking good! I like the dusty look to the weathering and the proportions seem to fit well too. The red panel seems to fit in well with the costume as well.The only thing missing really are the frayed edges to the strips of the shawl as yours appear to be quite neat. It might not prevent clearance unless your gml specifically notices this. It could be something you can alter and would add to the overall well worn look the character has. Sometimes frays will appear on material naturally so this may start to happen or just need some coaxing?A handy tip to getting frayed edges is to cut the material a little with scissors then tear by hand. You can get instant frays and irregular shaped strips which a lot of Tuskens use. It will of course depend upon the material used how easy or difficult this will be to achieve.Apart from that though you are making good progress [emoji4][Edit - I forgot to mention ask…]Thanks for showing your construction process as that will be helpful for others!And what type of paint did you use? I think it will be helpful for others to be aware of. Thanks [emoji4]Sent from my iPhone using Tapatalk Quote
Kagamaru Posted March 3, 2025 Author Posted March 3, 2025 3 hours ago, Nezhdanov said: The only thing missing really are the frayed edges Yeah I figured that would happen naturally as I keep messing with it. I’ll take a comb to it and see if I can help it along. I’ll upload photos of the paint. Thanks! 1 Quote
Kagamaru Posted March 3, 2025 Author Posted March 3, 2025 Weathering paint: All flat. Sand, Warm Caramel, and just a flat gray primer from Behr. That’s for the overall hardpan dust look. The Sand is for the lighter shoulders (pics of this in a following post) and the Warm Caramel to hit spots where it kind of looks rusty here and there. 1 Quote
Kagamaru Posted March 4, 2025 Author Posted March 4, 2025 Needed to lighten the shoulders a bit to match the original a bit more and added the stripes on the third band. I removed the top stitches on the red panel I was looking at the crl image which has stitching, but the original doesn’t look like it has any. Someone pointed this out on the Facebook group. Added a seam row starting under the third band and just behind the arms as per the original. Picked out the edges and roughed them up. I like this a lot better. I’m going to add some more paint so they don’t stand out as hard black. If you need to fray the edges use a pick of some sort (this is a leather punch) to comb them out grab the threads and pullllllll…. Every day a little closer. Quote
Nezhdanov Posted March 4, 2025 Posted March 4, 2025 Looking good! The frays suit it much better [emoji4]I was going to mention the stitching on the red panel seemingly being a bit more noticeable on your costume. I thought better of it as I felt I would be being too picky as the crl does have some visible stitching.Looks better for the stitching not being as visible. This is difficult to pickup in the series where the panel is not as defined but as we have some display images, it shows a bit clearer that stitches on the panel don’t seem to be very visible [emoji106]The 501st sometimes get branded as being elitist amongst some costumers as we have a level of standards to adhere to. It can be a challenge to advise ‘the right amount’ to meet clearance versus being exacting with details.I always advise costumers to refer to the source material primarily and use crls as a guide. There is text at the start of every crl stating, ‘This document is not intended to be a detailed how-to on costume construction; rather a visual guide to be used for 501st costume approval. Details on construction may be found on the respective costume detachment web forum’.Every costume is an interpretation of the original, the crl is the first costume to document the process so may have areas that others will improve upon.I’m enjoying your weathering and am looking forward to seeing more of the costume [emoji4]Sent from my iPhone using Tapatalk Quote
Kagamaru Posted March 4, 2025 Author Posted March 4, 2025 Okay got the frayed edges blended in. I’m very happy. I’m calling this done. On to pants, arm, and boot wraps. Quote
Kagamaru Posted March 6, 2025 Author Posted March 6, 2025 Obi time: No weathering/fraying yet. Right now the belt is 3 inches wide. I know the crl says two but because I’m 6’ and probably a bit taller than the screen Tusken Warrior I wanted to make sure it looked in proportion. Thoughts on this? I couldn’t find reference for the back clearly. There looks to be a buckle of some sort on the leather part. The Obi, I just used a little leather from the same stuff that’s going to go on my mask mouth and tried to imagine how I might tie it together in the desert. I pleated the ends so it would wrinkle. I can scrunch it up so it’s just above the top of the belt. The bottom has a channel sewn for the apron chain. That should pull it down like it is in the source. Quote
Recommended Posts