Nezhdanov Posted March 6, 2025 Posted March 6, 2025 Looking good! The construction process is helpful.As for the sizes, yes, correct proportion is better than absolute sizes.There is a bit in red at the start of every crl…- Measurements given in this document are intended to be approximate and generalized; not criteria for approval.- Requirements for all 501st costumes are proportional to the wearer in scale, fit and size [emoji4]Sent from my iPhone using Tapatalk 1 Quote
Kagamaru Posted March 7, 2025 Author Posted March 7, 2025 I saw this discussed in another thread but didn’t find a definitive answer. How is the belt buckled in the back? Anyone know? Quote
Kagamaru Posted March 7, 2025 Author Posted March 7, 2025 Weathering on the robe with details. The belt is just loosely wrapped and not even started on. Just wanted to get an idea of placement. Once I figure out the buckle for that and get it tighter I think it will really pull together. For weathering pay attention to the stripe and twin sun motif for sure, but don’t miss the subtle crisscrossing pattern on the legs and the small light dots above and below the waist. They look intentional like constellations. Perhaps the patterns have a Tusken cultural reference. Quote
Nezhdanov Posted March 8, 2025 Posted March 8, 2025 Some good weathering!I can’t remember seeing the buckle at the back documented in the crl build or a definitive answer how it’s attached anywhere either. As it is vague from the tv references, a version you decide upon should be fine if it looks similar to what we see in the series.Occasionally GML’s will approach us with questions so we are able to advise when needed.Generally though, I feel most GML’s will be fine if it looks ok.Looking forward to seeing more of the build. [emoji4]Sent from my iPhone using Tapatalk 1 Quote
Kagamaru Posted March 8, 2025 Author Posted March 8, 2025 Dying cheese cloth for wraps and tooling the belt today. Quote
Kagamaru Posted March 8, 2025 Author Posted March 8, 2025 Leather weathering how to… Make sure you work in thin layers paint on the dye and wipe it down. For the warrior the edges are darker than the middle so layer it up there a bit more. Video: https://imgur.com/a/VhyL01O Quote
Kagamaru Posted March 9, 2025 Author Posted March 9, 2025 Pants. Hot glue and a couple hours. Pants are like twice as heavy now. Haha! I’ll probably add some more layers with any remaining cloth after I’m done with the sleeves and mask. Mostly used bull denim with a bit of dyed cheese cloth. 1 Quote
Kagamaru Posted March 11, 2025 Author Posted March 11, 2025 Boots are in. https://a.co/d/5maQmQX Cheap Ugg knock offs. I was going to remove the fur but I don’t think it’s removable. Feels glued in. Much sad. Oh well, I have hotter costumes. Quote
Kagamaru Posted March 17, 2025 Author Posted March 17, 2025 More progress. Boots wrapped and weathered. I wrapped them all the way over the top so none of the boots or inner lining shows. Here’s a little process and the whole thing so far. I dyed the bull denim with brown Rit dye for just 15 minutes so it wouldn’t get too dark. Then I used the same paint that I used on the shawl to add more depth and dirt. 2 Quote
M.J. Posted March 18, 2025 Posted March 18, 2025 Cant get out of my head is hot glue! ...lol Its one way. A thought next time mix and match, sew and glue the parts you have issues with. Quote
Kagamaru Posted March 19, 2025 Author Posted March 19, 2025 On 3/18/2025 at 5:56 AM, M.J. said: Cant get out of my head is hot glue! ...lol Its one way. A thought next time mix and match, sew and glue the parts you have issues with. Wait for what? What is this comment referring to? Quote
Kagamaru Posted March 19, 2025 Author Posted March 19, 2025 Are there any measurements for the pineapple end of the warrior’s staff? Quote
Nezhdanov Posted March 19, 2025 Posted March 19, 2025 Are there any measurements for the pineapple end of the warrior’s staff?It is best to make it proportionate to your individual build. For example, if a really tall costumer or really petite costumer made this costume, absolute sizes may look wrong for both.This is a display model so not an ideal reference but does give an indication of how tall relative to the costumer it should reach.There are action images from the series that may give an idea of pineapple size relative to the characters hand. [emoji4]Sent from my iPhone using Tapatalk 1 Quote
Kagamaru Posted March 21, 2025 Author Posted March 21, 2025 Did some belt leather work last night and more on the way tonight. I’m going to blast some paint on the buckle so it’s not shiny. Here’s some process for the stitching. I used mock sinew for it. It looks very authentic to what a Bedouin creature might make. Used Chicago screws for the buckle fold. 1 Quote
M.J. Posted March 21, 2025 Posted March 21, 2025 You used hot glue for your pants, mentioning they're quite heavy. It might be easier for next time, lay the fabric out before sewing the pants sides up and sew the wraps on, the sew line can be hidden by the next wrap and the way would bits a little hot glue. You may notice in the photo from Celebration, they had sewn the wraps down the side of the leg, making them a little loose so she has movement. 1 Quote
Kagamaru Posted March 21, 2025 Author Posted March 21, 2025 6 hours ago, M.J. said: You used hot glue for your pants Ah gotcha! Yeah I thought about that but I couldn’t figure out how to get it onto the sewing machine as I just have a basic one. It doesn’t have room to slide the pants very far to get the stitching. The way they are with glue is manageable. I definitely need an industrial sewing machine haha! Quote
Nezhdanov Posted March 21, 2025 Posted March 21, 2025 With my Tusken wraps, the hot glue can get a bit spongy with heat and wear. All it needs is some glue reapplying every now and then to fix the wraps down again.Although sewing would have been better [emoji4]Sent from my iPhone using Tapatalk 1 Quote
Kagamaru Posted March 24, 2025 Author Posted March 24, 2025 Got the belt buckle installed and weathered. Finished the stitching on the belt. Added a catch loop to hold the loose end of the belt. Added the leather greeblies. (Ran out of Chicago screws and had to order more. So that will be done this Tuesday when the rivets and post studs for the pouches come in. Oh I made pouches! Ordered the ball studs. Lastly I wrapped the sleeves. I just went ahead and applied right to the garment sleeves instead of doing a completely separate over-sleeve. I didn’t want to add too much more bulk under the cape. 1 Quote
M.J. Posted March 24, 2025 Posted March 24, 2025 You dont need an industral machine. For example your sleeves, you made the tunic ...Yeah. So before you attach the sleeves sew the strips on first, you can see in this photo the fabric is sewn in the sleeve seam, if you didnt want to have another layer. With the CRL it can be either way, its the end result is important. Btw love the leather work you doing Quote
Kagamaru Posted March 30, 2025 Author Posted March 30, 2025 Belt is done. Pouches are attached with Chicago screws and functional. I put a little Velcro to hold them closed. These stems are called Ball Head Studs if you need to find them. 1 Quote
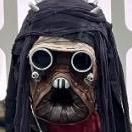
Kagamaru Posted April 6, 2025 Author Posted April 6, 2025 (edited) Making the mask. I guess I’m reprinting the nose piece because it’s too symmetrical. Other than that I’m fairly happy with progress so far. Got a troop tomorrow then back on it. Hope to get some snout leather down. I’m posting pics of the inside of the snout here for those that follow. I couldn’t find a good tutorial and view of the inside. So here’s my best guess. I’m not using real leather for this part. I couldn’t figure out how to make it wrinkle with the really tight wrinkles so I just kind of faked it with individually folded strips over the initial turned and stuffed material. I like it and feel it hits the right notes for the warrior when I look at it side by side. edit: I forgot to add…Use Gorilla Glue Thick Gel superglue to stick vinyl to vinyl. Hot glue peels right up. Immediately. Edited April 6, 2025 by Kagamaru 1 Quote
Kagamaru Posted April 7, 2025 Author Posted April 7, 2025 Got the leather wraps and eyes on today. Now looking at the reference I need to reposition the blood splitters closer to the eyes. I’m using real buffalo leather for the wraps that I got on Amazon. It’s great because if you just kind of wad it up before you put it on it varies the color nicely for a weathered look. Used gorilla glue again for this part. Hot glue for the eyes. Also, as I was looking for screen shots of the front of the face I found these shots of the belt. The crl says that no studs are to be seen, indents only. But on screen on the show it definitely looks like they punch through. Thoughts? I think I’m going to darken the inner barrel of the eye pieces. Every shot I see looks like the inner walls are darker than the outer the ridge you see in mine will cradle the black lens or screen I use to hide my eyes. https://i.imgur.com/noo3t9U.gifv Quote
Kagamaru Posted April 8, 2025 Author Posted April 8, 2025 Moved the blood splitters tonight. I like the position much better now. Taking a proper photo without the wide lense helps too. 1 Quote
Nezhdanov Posted April 8, 2025 Posted April 8, 2025 Glad you switched to non wide lens! I was beginning to wonder how the head was looking so unusual [emoji4]As for the stud on the pouch, I’ve found a similar image.What likely happened was most of the screen action shots were probably not so clear so the display image was referred to. However, as can happen with display set ups, the costume was not put together the same as the tv show. The display image does not have a stud showing so it was missed.There are a few updates we want to make to the warrior crl but there have been some ongoing problems with mechanisms to update crls. These are not issues with the Krayt Clan detachment so it is out of our hands. When the problems with updating crls is resolved we can begin to add the alterations.If you continue with the reference showing the stud, we can affirm that this is correct if it is challenged during clearance. You can always reference this thread.Crls and costume understanding is an evolution often with members like yourself picking up the finer details!Keep up the good work [emoji4]Sent from my iPhone using Tapatalk 1 Quote
Kagamaru Posted April 14, 2025 Author Posted April 14, 2025 More progress! I filed the left nose slot to widen it and make it asymmetrical. Then added the first layer of tan wraps on the helmet. I’m still going to weather the strips more with some different tones to give them more depth. Black wrap is next. Getting closer! I’m bound and determined to finish this tutorial all the way to the end. Question: For the gaiter around the neck. Is that attached to the mask? Or is it a separate piece? Like a loose neck seal? Any links or info on that would be appreciated. Quote
Recommended Posts