Psibur Posted November 2, 2021 Posted November 2, 2021 (edited) There’s several WIP threads here that’s helped me BIG time already, so I’m more or less brain dumping what I’ve learned along the way which can hopefully be of some help. So far I have the mask kit and a bunch of fabric I picked up a year or so ago (so I need to revisit that). I picked up the mask from this DH-P/FX and I’m super impressed. The packing and parts were great, but his three instructional videos made my life so much easier. He lays out exactly what tools you’ll need to get the job done. Mask pics: (I’ll add more pics of the unpacking and assembly when I get to my computer) Edited November 4, 2021 by Psibur adding smaller sized pics Quote
Psibur Posted November 4, 2021 Author Posted November 4, 2021 Question: I know there's no defined measurements for the head spikes (at least that I'm aware of), but are these acceptable (pics below and above)? Asking before I start applying the wraps: Lesson learned: Since everything will be covered by wraps, figured it was okay to create a hole under the muzzle to allow my screwdriver to reach the screws going into the "teeth". Yep, that's a screwdriver hole. Quote
gSkruBg Posted November 4, 2021 Posted November 4, 2021 I would put the head spikes a bit closer together. You don't want them to be on the side of the mask. Quote
thebrighton Posted November 4, 2021 Posted November 4, 2021 Spike position is in the eye of the beholder, they look ok to me. What I would suggest is to rotate the eyestalks 45 degrees so the slots are more to the outside. Most of the screen used lids were like this. Quote
Nezhdanov Posted November 6, 2021 Posted November 6, 2021 Welcome!It’s good you’ve been checking out the existing builds people have put up, it’s always a good start! Also I’d suggest checking out the crl for the A New Hope (ANH) costume (if you haven’t already) as there may be things on there now that other builds didn’t have to consider as some builds on here can go back a few years [emoji1303]https://databank.501st.com/databank/Costuming:TuskenRaiderMaleANewHopeIt will no doubt be useful for others to see what you create and anything you learn along the way.Some members drill additional holes in the plastic of the Tusken head like the one you have to help with the heat. As you say it all gets covered with wraps!Other than that, ask any questions you need to and hopefully enjoy your Tusken build!Sent from my iPhone using Tapatalk Quote
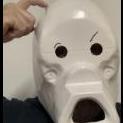
Psibur Posted March 11, 2022 Author Posted March 11, 2022 Been a while since I've done some work. Bit curious if the mouth leather is acceptably "wrinkled" enough to pass? I know the pics seem to have a lot more creases and folds, but I'm also hearing that as long as it's not flat or "blocky" it'll be fine too. The outsides will be pulled back more when I apply the straps around the outside of the mouth, but here's the best I could get so far: Quote
shaggy13 Posted March 11, 2022 Posted March 11, 2022 I think a thinner leather is needed to get the wrinkles for ANH style. I used a 1oz. leatherIMG_6406.heic 1 Quote
Nezhdanov Posted March 12, 2022 Posted March 12, 2022 Hi, as for the mouth folds, it is difficult to know exactly what will clear as clearance will be done at your local garrison and different garrisons will call out different things to be amended or not during the clearance process.The crl guide states ‘Tucked mouth area is not uniformly "pleated" and must be accurate to the references’. The black and white photo thebrighton posted on this thread back in November 2021 is one such reference as it is the stunt / actor Peter Diamond who fights Luke in the film. That mouth has a lot of creases which may or may not be be a clearance issue for your folds.Finding soft enough and thin enough leather to create the folds can be difficult. We used vinyl which can be a lot easier to use.The leather you are using may need to be a little darker brown as the folds appear to be dark in the film.Hope that helps [emoji1303]Sent from my iPhone using Tapatalk Quote
Psibur Posted June 15, 2022 Author Posted June 15, 2022 (edited) Okay, I got my hands on some much thinner leather than before. I'm still trying to figure out how to get it more wrinkles/puckered but drawing blanks on how to go about it and not blow through my leather supply. Have to admit I got frustrated and was getting ready to put the helmet away when I inadvertently pulled the leather inside the mouth tighter when I picked it up. Looked down at it before putting it in the box and noticed tons of wrinkling (doesn't show as well as I saw but I might have loosened it up between then and taking the pic). This more in line now with an acceptable mouth? Edited June 15, 2022 by Psibur 1 Quote
Nezhdanov Posted June 16, 2022 Posted June 16, 2022 Well done for sticking at it, it can be tricky to do but it’s looking a lot better than before. This image is the one I’m referring tooIf you could replicate the right hand side (as you look at it) on the left a bit more it would look a pretty good mouth with good creases. If you can’t I think what you have might be ok. It is one of the more tricky areas of the head so hopefully the other elements will be easier and you will be on your way to having a good Tusken head. [emoji1303]Sent from my iPhone using Tapatalk Quote
Psibur Posted July 4, 2022 Author Posted July 4, 2022 Current state of the mask after swapping out the mouth leather. I now understand why there aren't many WIP videos of the entire wrapping process. It gets a little tedious/repetitive, but for me I found it to be a bit of a focused meditation putting the straps on and watching the plastic eventually get covered up. I keep wondering if it's because I made the average strap size too narrow, but I do say I had to lay straps over it a few time to get a feel for how they would lay down and get ideas how to cover the plastic and wrap around the eyes, spikes, snout, etc. Using the "lowbrow mohawk" layout to start (one strip above the eyes and another going between the eyes over the back) got me started and the rest fell into place pretty well. I'm not sure if it's the lighting or my phone, but the colors just seem off between them and the mask. All that being said, should I tuck the straps up at the bottom mask and glue inside to 'tidy up' or just let the over hangs dangle down? Quote
Nezhdanov Posted July 4, 2022 Posted July 4, 2022 Hi, well done for getting the head wraps to look random, it can be tricky [emoji1303] The ANH crl states ‘Head wraps are not unkempt and do not hang loosely over the neck or shoulders’ so hopefully that answers your question. I trimmed and glued mine about an inch inside.As for the phone, I’ve found that colours are often bleached out or not truly representative of what you see and phone photos can sometimes give a ‘fish eye’ lens effect when trying to take close ups. I think it’s because phones have an ‘all rounder’ type of lens. Light bulbs can add a yellow tinge and natural light can loose some of the colour depth so it’s what works best for you really [emoji1303]Anyway good progress!Sent from my iPhone using Tapatalk Quote
Psibur Posted November 5, 2022 Author Posted November 5, 2022 I had fun with the respirator. I followed along with DZ50297's method for making his on this link below, mostly because it gave me a chance to use my Dremel a bit: https://www.kraytclan.net/forum/topic/4413-tampa-bay-gets-a-tusken-lots-of-pictures/page/4/ Basically it uses one small tomato sauce can. Smallest they had that fit the size requirements. I think there's really only one "small" sized can. It also uses two Reddi Wip cans of whipped cream. I got REALLY lucky and noticed about a dozen or so cans laying along side the road that must have fallen out of a truck or something (yeah, yeah, this time it really did happen). Most were flattened but there were a couple that were salvageable and one had a bit of roughing up in the area I needed to cut off, so bonus weathering! First I drained the paste out by cutting a small square mostly off. Not completely cut off, so the piece will stay attached just long enough to rinse out the stuff and a visible square won't be seen under the leather wrapping. Didn't want risk it exploding paste all over my kit if something happened. The neat thing is, coincidentally, where you see the the line between the white at the top and the red (or whatever flavor you have) background is exactly where you want to cut. It will then fit perfectly in the top and bottom of the sauce can. I (heh) snipped the tip, took a screwdriver to punch out the nozzle & inner workings so it left just a hole which I drilled out because that also fits the required rod width which gets inserted and hangs around your neck: The caps were just orange juice caps from Wegman's. These were the closest I could find to fit and fall into the guidelines of the CRL without buying and wasting other cans of cleaner or whatever. In some of the reference pics I've seen online, the seam between the two cans the original crafter use could be seen under the leather wrapping. I played with it a bit and because the leather was thin enough, I just wound some of the jute I'm going to use on the sash around 2-3 times and it seemed like it did the trick: For the bar, I went feral and drilled a hole through the side of my workbench to use for bending the rod. I measured out a bit and made the ends start bending around two inches, then I bent the back and mid parts to fit. The can floats free in case I need to replace/repair anything. I'm going to weather it a bit more but you get the gist. Quote
Nezhdanov Posted November 6, 2022 Posted November 6, 2022 Good work with the breather, I found it to be a fun thing to build too, made from bits round the house mostly. That’s what I like about this costume in particular, the amount of different ways to solve the same problem! The end caps are broader than the clearest film reference but meets the crl.The head is taking shape, be good to see more[emoji1303]Good to see another ‘how to’ on here also, thanks!Sent from my iPhone using Tapatalk Quote
Recommended Posts
Join the conversation
You can post now and register later. If you have an account, sign in now to post with your account.